Vamhi Xero Settings helps customers connect Jira Cloud with Xero so finance and delivery information can be viewed in one place. After the app is configured, users can see relevant Xero invoice, payment, customer, and tracking information directly from Jira issues.
This guide is written from a customer perspective. It explains what the app does, what access is required, how a Jira administrator connects Xero, and where users can view Xero information inside Jira.
Customers often manage work in Jira and financial records in Xero separately. This can create manual follow-ups, repeated status checks, and delays when project, support, operations, and finance teams need the same information.
For organisations that manage projects, support requests, client work, or delivery tasks in Jira while handling invoicing in Xero, this integration improves visibility, reduces manual follow-ups, and helps teams make faster, more informed decisions.
This guide is intended for customers who need to set up, manage, or use the Xero integration in Jira.
Audience | How they use the guide |
|---|---|
Jira administrators | Connect Xero, manage credentials, configure field mappings, and troubleshoot setup issues. |
Finance teams | Understand which invoice and payment details are visible to Jira users. |
Project managers | Review billing context while tracking project or delivery work in Jira. |
Support and operations teams | View customer billing information while working on Jira issues. |
Before configuring Vamhi Xero Settings, confirm that the required Jira and Xero access is available. This helps avoid setup delays and authentication errors.
Jira Cloud site access.
Jira administrator permission to configure apps and manage settings.
Access to the projects where Xero information should be displayed.
Access to the correct Xero organisation.
Permission to create or manage an app in the Xero Developer portal.
Permission to approve the connection between Jira and Xero.
Required detail | Description |
|---|---|
Redirect URI / Callback URL | The URL copied from Jira and added to the Xero Developer app. It must match exactly. |
Client ID / Client Key | The unique identifier generated by Xero for the connected app. |
Client Secret | The secure key generated by Xero and entered in Jira to complete authentication. |
Important: The Redirect URI / Callback URL must be copied exactly from Jira into the Xero Developer app. Extra spaces, missing characters, or URL changes can cause authentication to fail.
The following examples show how customers can use Vamhi Xero Settings to improve visibility between Jira work items and Xero billing information.
Use case | Customer benefit |
|---|---|
View invoice details in Jira | Open a Jira issue and review related Xero invoice information from the Xero tab, without switching to Xero separately. |
Track payment status | Quickly check whether an invoice is paid, pending, authorised, or still has an amount due. |
Connect work with billing | Link Jira issues with Xero invoices using mapped Jira custom fields, such as invoice number, customer email, due date, or tracking project. |
Reduce internal follow-ups | Allow project, support, and operations teams to check available invoice details themselves instead of repeatedly asking the finance team. |
Support client and project workflows | Help teams understand the billing context of a task, project, or customer issue while staying inside Jira. |
ℹ️ Purpose: This section helps Jira administrators connect Jira Cloud with Xero in a secure way. After setup, Vamhi Xero Settings can read the relevant Xero invoice information and show it in Jira through field mapping and the Xero activity tab.
ℹ️ Why this matters: This is where you start the connection setup. Opening the right page first helps you copy the correct values and avoid using credentials in the wrong place.
In Jira, navigate to:
Jira Admin Settings → Apps → Xero Settings
The Xero Settings page contains two tabs:
Xero Connection — used to add Xero credentials and authenticate the integration.
Field Mapping — used to map Jira fields with Xero information.
Start with the Xero Connection tab.
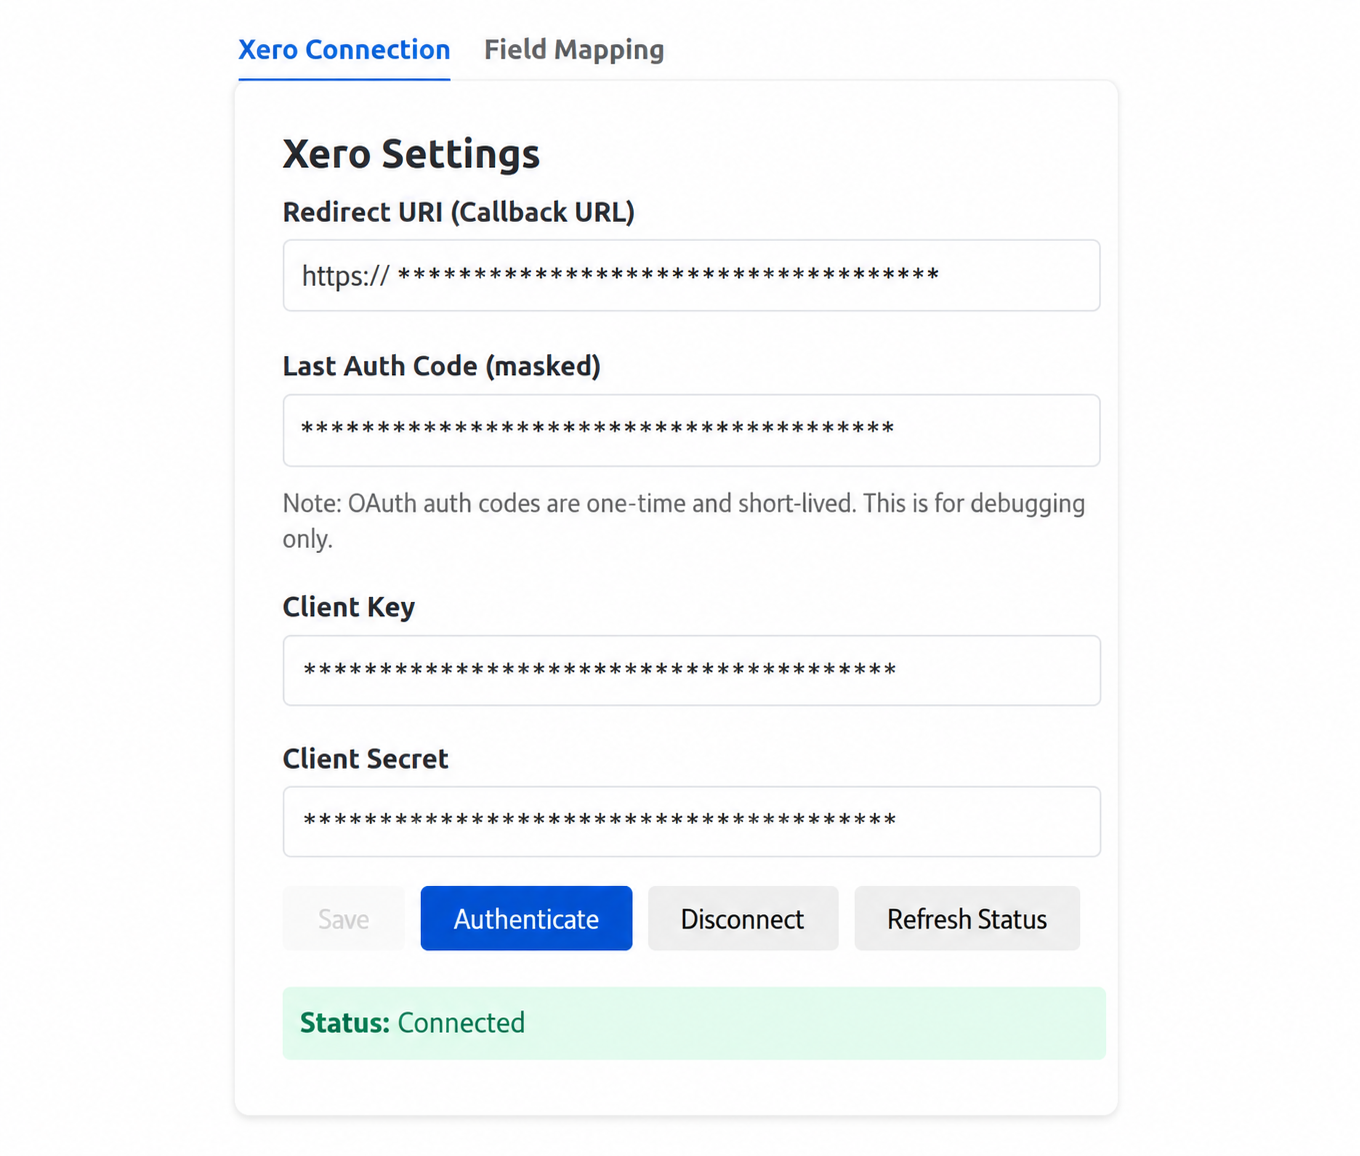
ℹ️ Why this matters: The callback URL is the address Xero uses to send you back to Jira after approval. It must be exact so Xero knows it is returning to the trusted Jira app.
Important: Copy the Redirect URI / Callback URL exactly as shown. Authentication may fail if the URL contains extra spaces, missing characters, or any manual changes.
On the Xero Connection tab, copy the Redirect URI / Callback URL shown in Jira.
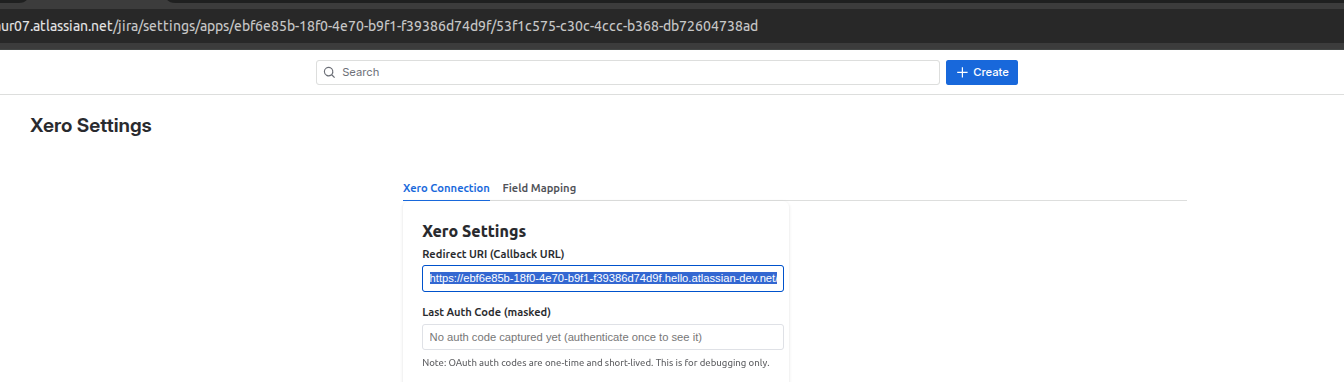
ℹ️ Why this matters: Xero needs to know which app is allowed to connect. Adding the Jira callback URL to the Xero Developer app links both systems together safely.
Open the Xero Developer portal and go to your Xero app configuration. Xero Developer portal
Paste the copied Redirect URI into the Redirect URIs section of the Xero Developer app, then save the configuration. The Redirect URI in Xero must exactly match the Redirect URI shown in Jira. If it does not match, authentication may fail.
The Xero Developer app configuration page should show the following details:
Redirect URIs
Client ID
Client Secret
Save button
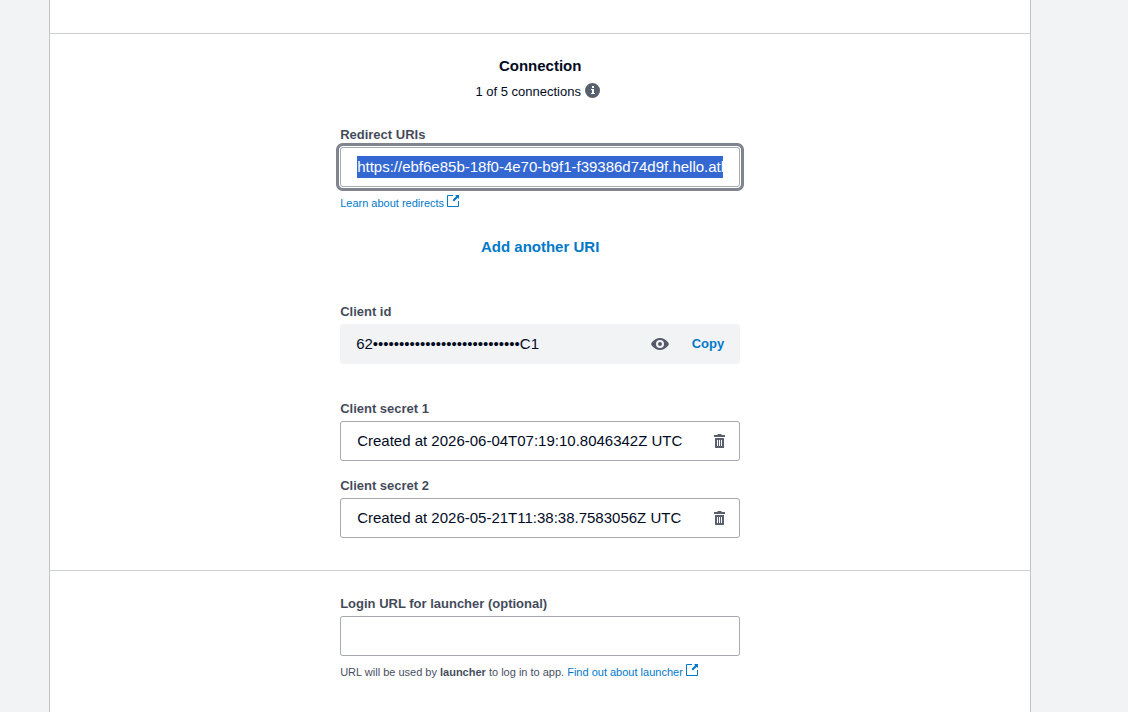
ℹ️ Why this matters: The Client ID and Client Secret are the secure details Jira uses to recognise your Xero app. Treat the Client Secret like a password and only share it with trusted administrators.
From the Xero Developer app, copy the required credentials:
Client ID
Client Secret
Return to the Xero Connection tab in Jira and paste these values into the matching fields:
Xero Developer app value | Jira field |
|---|---|
Client ID | Client Key |
Client Secret | Client Secret |
ℹ️ Why this matters: Saving stores the connection details in Jira. Authenticating then opens Xero so the administrator can approve access for the correct Xero organisation.
After entering the Client Key and Client Secret, click Save.
Once the credentials are saved, click Authenticate.
On the Xero consent screen, select the correct Xero organisation.
Approve the connection between Jira and Xero.
After approval, Xero redirects the administrator back to Jira.
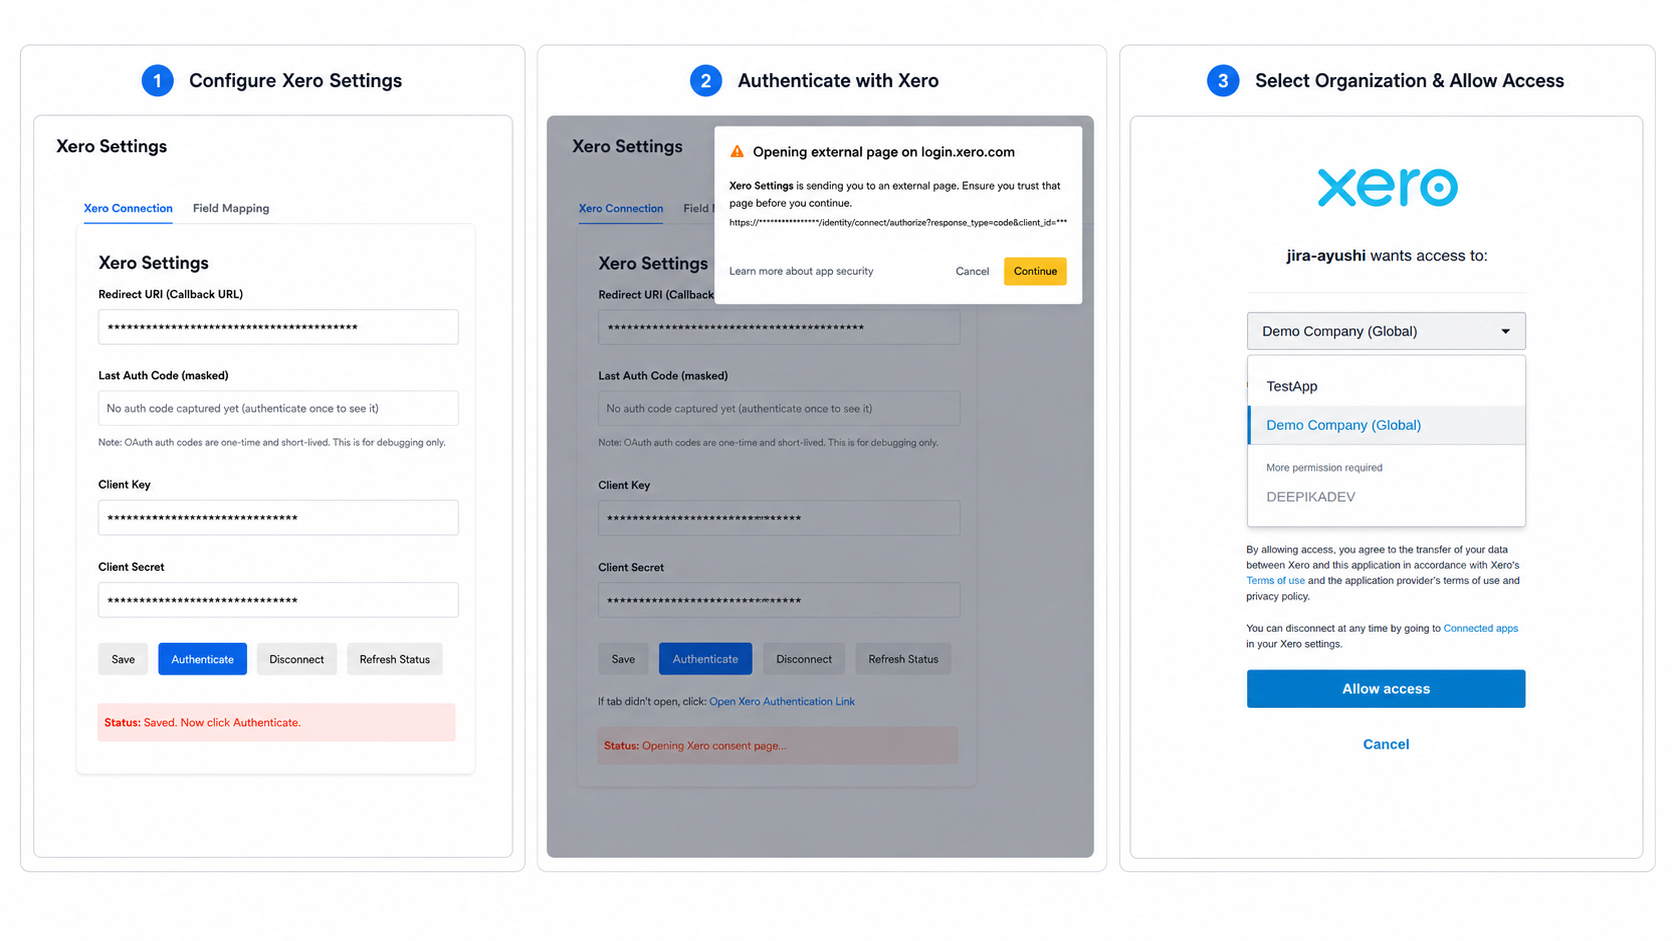
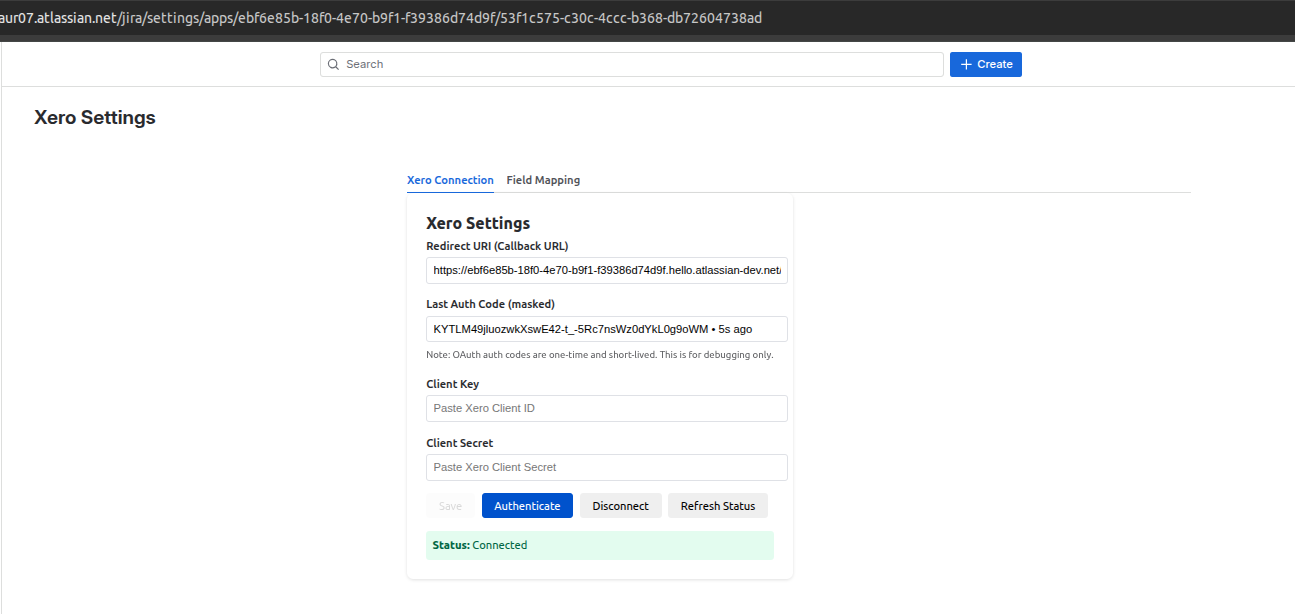
Expected result: After authentication is completed, Jira returns to the Xero Settings page and the connection is ready for field mapping.
After the Xero connection is complete, continue to the Field Mapping tab. This is where you choose which Jira custom fields should be linked with Xero invoice information.
ℹ️ Purpose: Field Mapping connects a Jira custom field with a Xero invoice field.
In plain language, this tells the app which Jira value it should use to find the right invoice in Xero and which invoice details it can show back on the Jira issue.
Use this section to configure the fields that your customer, finance, project, or support teams rely on most when reviewing billing information from Jira.
A field mapping creates a relationship between one Jira custom field and one Xero invoice field.
For example, if a Jira issue has a custom field called Xero Invoice Number, you can map it to the Xero field Invoice Number. The app can then use that invoice number from the Jira issue to find the matching invoice in Xero.
Example field mappings:
Jira custom field | Xero field |
|---|---|
Xero Invoice Number | Invoice Number |
Customer Email | Contact Email |
Invoice Status | Status |
Amount Due | Amount Due |
Due Date | Due Date |
Tracking Project | Tracking Category |
ℹ️ Why this matters: Opening the Field Mapping tab lets you decide which Jira fields the app should use when looking for matching Xero invoice data.
In Jira, go to:
Jira Admin Settings → Apps → Xero Settings → Field Mapping
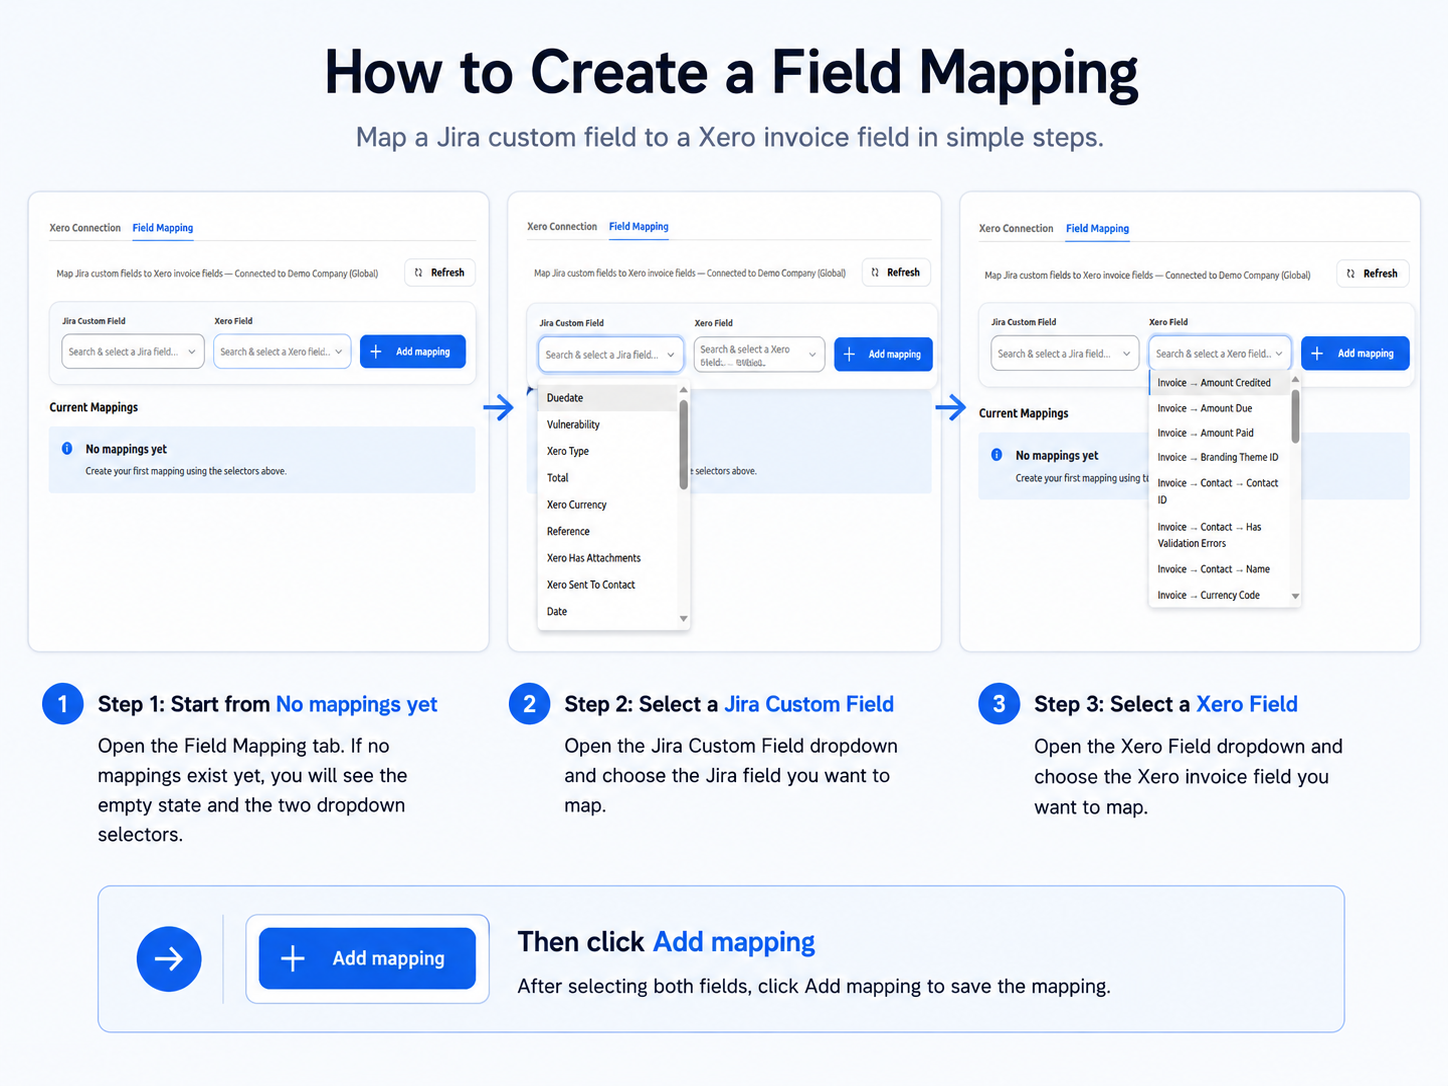
Before you continue: Make sure Xero is connected before setting up mappings. If Xero is not connected, the Field Mapping page may show a warning message and the Xero Field selector may not be available.
If this happens, return to the Xero Connection tab, complete authentication, and then come back to Field Mapping.
ℹ️ Why this matters: Jira needs fields where users can enter or store invoice-related values. Without these fields, the app has nothing to compare with Xero.
Before adding mappings, make sure the required Jira custom fields already exist in Jira. These fields appear on Jira issues and are used to store or match invoice-related values.
ℹ️ Why this matters: Each mapping tells the app how one Jira field relates to one Xero field. Start with the most important field first, usually Xero Invoice Number.
To add a mapping:
Select the custom field from the Jira Custom Field dropdown.
Select the matching field from the Xero Field dropdown.
Click Add mapping.
Review the saved mapping under Current Mappings.
For a setup, starting with these core mappings:
Jira custom field | Xero field | Customer benefit |
|---|---|---|
Xero Invoice Number | Invoice Number | Finds the correct invoice in Xero from the Jira issue. |
Invoice Status | Status | Shows whether the invoice is paid, pending, authorised, or overdue. |
Amount Due,Total | Amount Due | Shows the outstanding invoice amount without leaving Jira. |
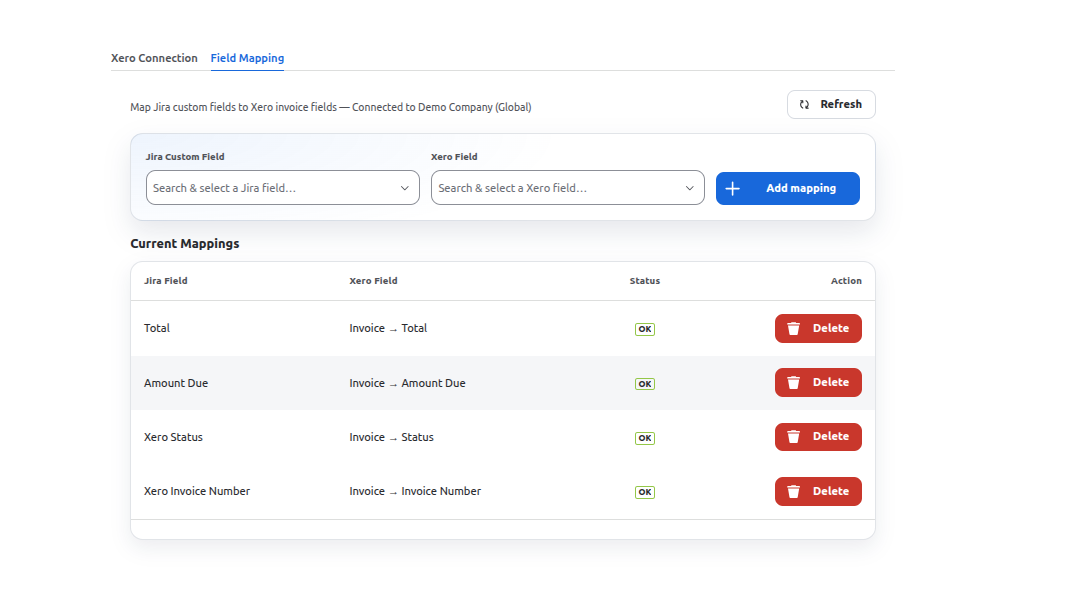
Expected result: After the mappings are added, check the Current Mappings section. If the configuration is valid, the mapping status shows OK.
Important: Always map Xero Invoice Number first. This is the key field that helps the app identify which Xero invoice should be shown inside the Jira issue.
After this mapping works correctly, you can add supporting fields such as Invoice Status, Amount Due, Due Date, and Customer Email to give users more billing context.
ℹ️ Why this matters: This section shows end users where to find Xero information after the administrator has completed the connection and field mapping setup.
After the Xero connection and field mapping are completed, users can view Xero invoice information directly inside a Jira issue.
The app uses the mapped Jira custom field value, such as Xero Invoice Number, to search for the matching invoice in Xero and display the related invoice details in the Xero activity tab.
Note: Xero data appears only when the mapped Jira field contains a value that matches an existing invoice in the connected Xero organisation.
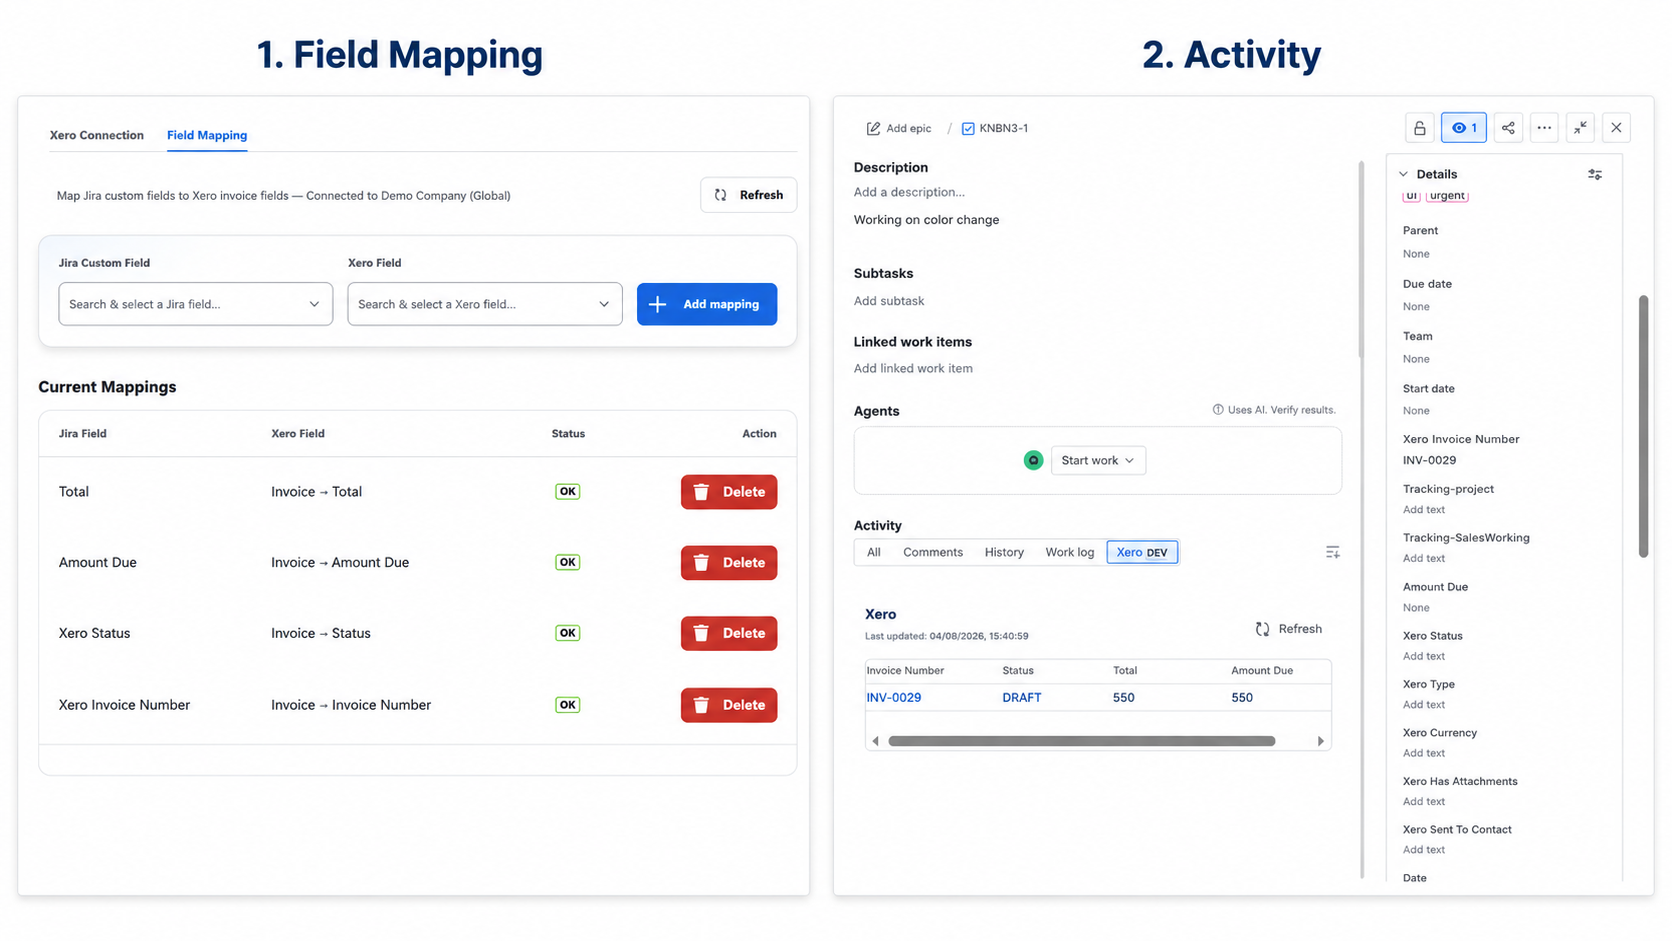
For example, if the Jira custom field Xero Invoice Number contains the value:
Example value: INV-0029
When this field is mapped to the Xero field Invoice Number, the app searches Xero for invoice INV-0029.
If a matching invoice is found, the Xero activity tab can display invoice information such as:
Invoice Number
Status
Total
Amount Due
Other mapped Xero fields
Open the invoice in Xero and copy or note the invoice number. Example: INV-0029
Important: This invoice number should match the value entered in the Jira custom field.
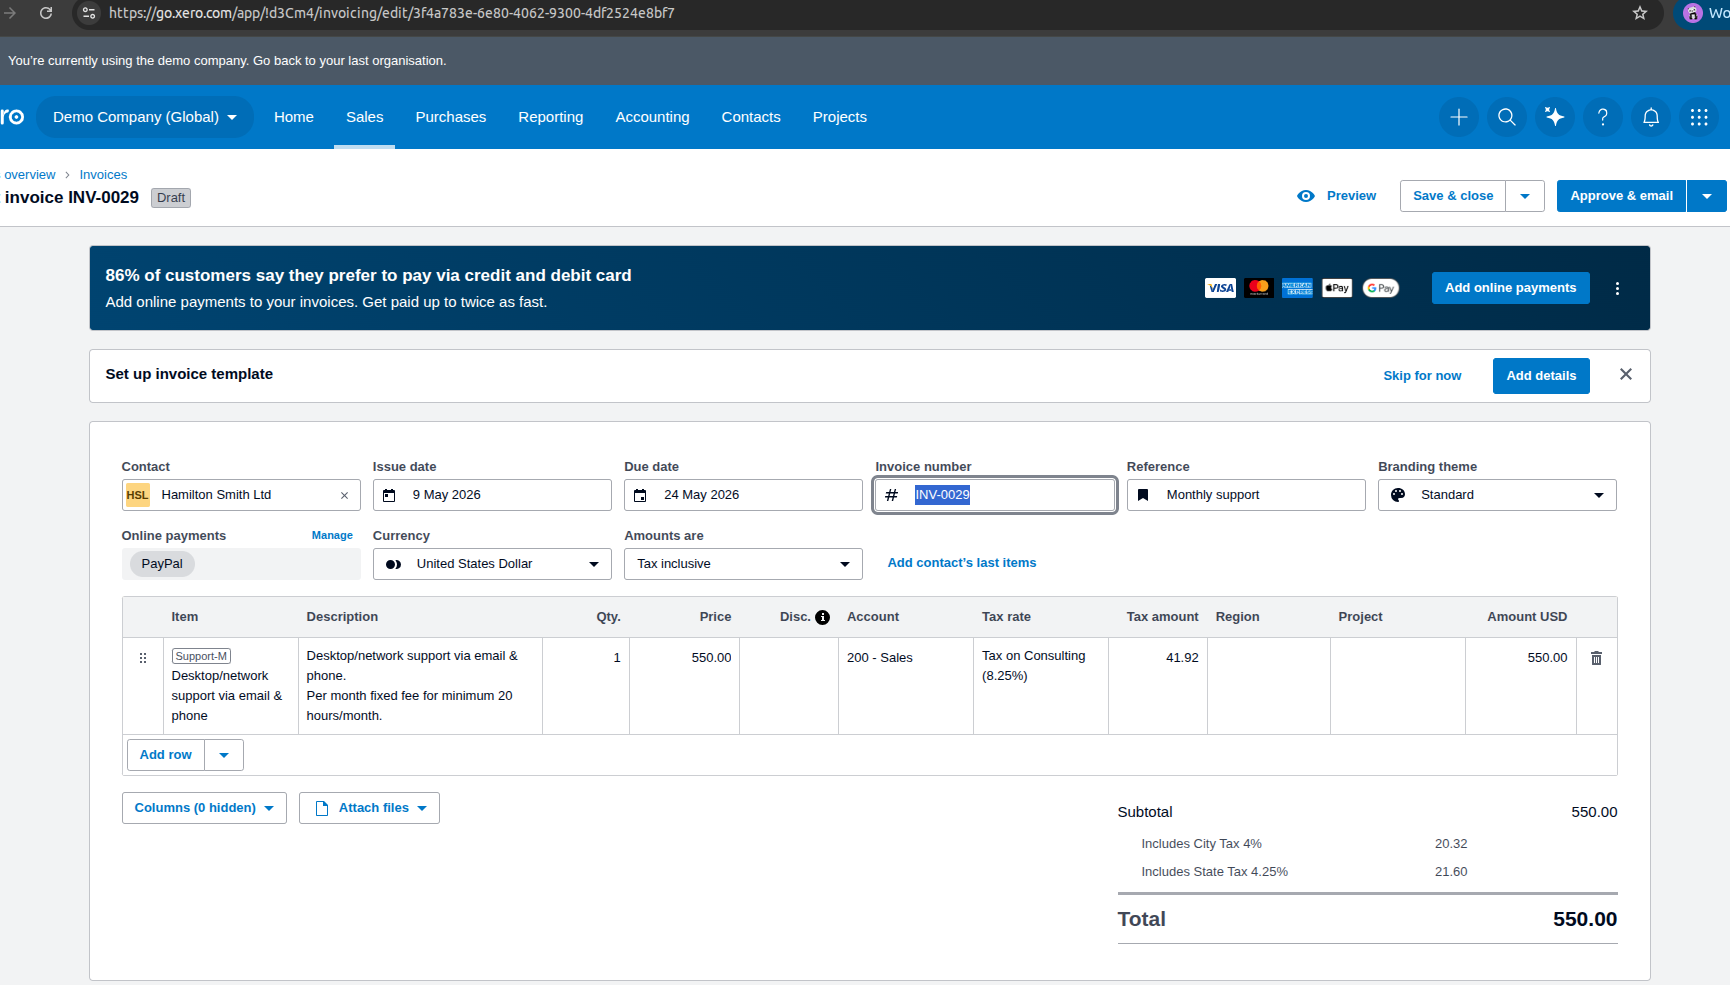
Step 2 : Enter the same Xero invoice number in the mapped Jira custom field. This value is used to find the matching invoice in Xero.
Open the Jira issue where Xero data should appear.
In the mapped Jira custom field, enter the invoice number from Xero.
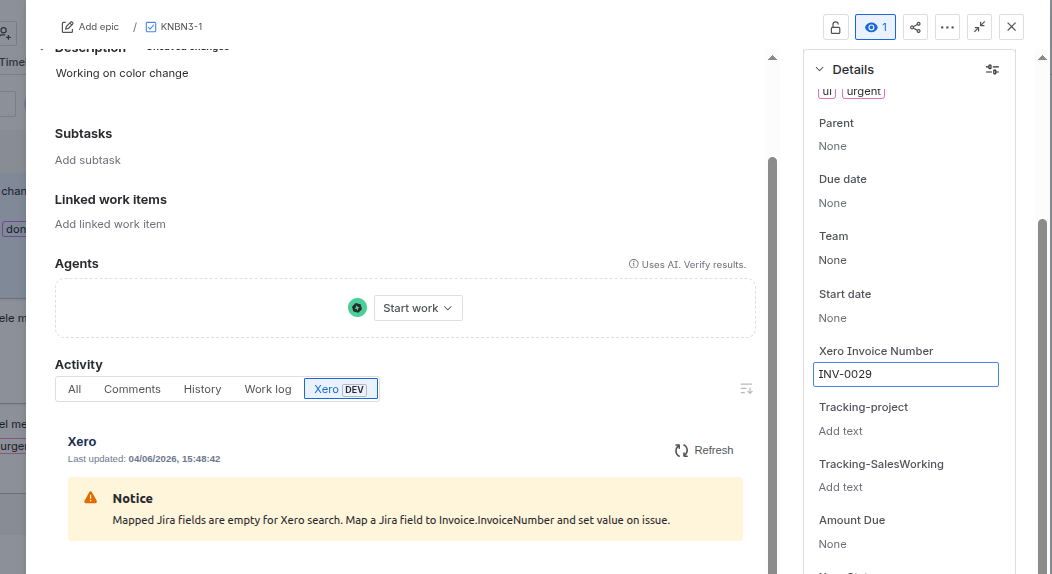
On the Jira issue, go to the Activity section and select the Xero tab. The app uses the mapped Jira field value to search Xero and display matching invoice information.
Click Refresh in the Xero activity tab to load the latest invoice information from Xero.
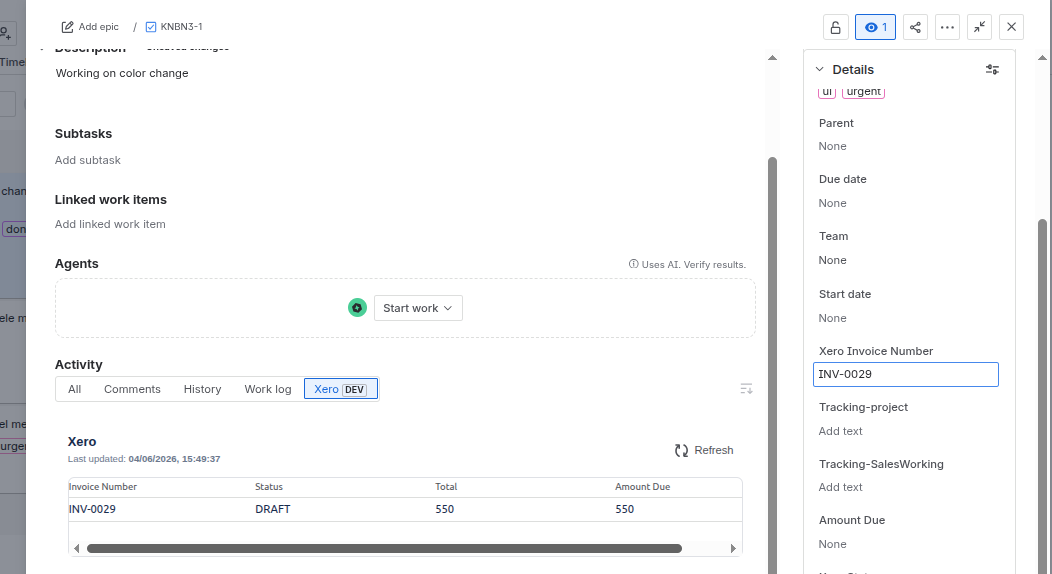
Use Refresh when:
The invoice was recently updated in Xero.
The Jira custom field value was changed.
The Xero data is not showing immediately.
You want to confirm the latest invoice status or amount due.
⚠️ Start here: If the Xero activity tab does not show invoice data, use the questions below to find the most likely cause.
Xero is connected successfully.
Field mapping is configured.
The Jira issue has a value in the mapped field.
The invoice number in Jira matches the invoice number in Xero.
The connected Xero organisation contains that invoice.
Click Refresh after updating the Jira field.
If the app shows No mappings configured, create field mappings first.
If the app shows No matching invoices found, verify that the Jira field value matches an existing invoice in Xero.
